
Advanced Product Types
How to add a variable product, grouped or linked product, external or affiliate product, and a virtual or downloadable product type. Reference the product setup page for info on basic product data and simple product includes. For products given additional features by installing an add-on, see the woo extensions page.
Variable Products
What is a Variable Product?
Variable products are a product type in WooCommerce that lets you offer a set of variations on a product, with control over prices, stock, image and more for each variation. They can be used for a product like a shirt, where you can offer a large, medium and small and in different colors.
Step 1. Set the product type
- Go to: WooCommerce > Products.
- Select the Add Product button or Edit an existing product. The Product Data displays.
- Select Variable product from the Product Data dropdown.

Step 2. Add attributes to use for variations
In the Attributes section, add attributes before creating variations — use global attributes that are site wide or define custom ones specific to a product.
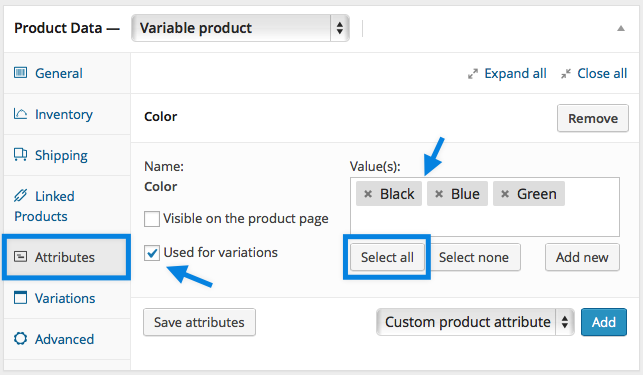
Global attributes
To use a global attribute:
- Select one from the dropdown and Add.
- Choose Select all to add all attributes to the variable product (if applicable).
- Tick the Used for variations checkbox to tell WooCommerce it’s for your variations.
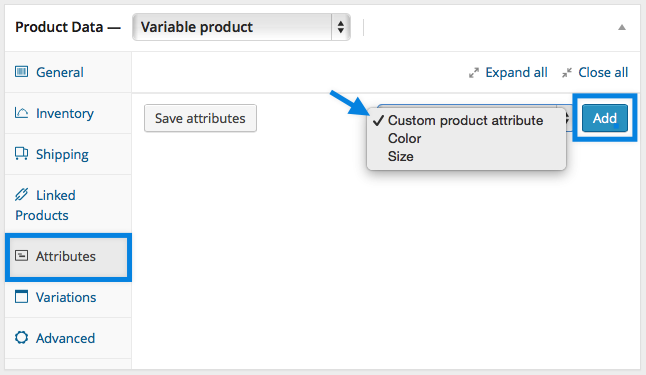
Custom attributes
If adding new attributes specific to this product:
- Select Custom product attribute, and Add.
- Name the attribute (e.g. Size)
- Set values separated by a vertical pipe (e.g., small | medium | large)
- Enable the Used for variations checkbox.
- Save attributes.
Setting Up Global Attributes
Adding Custom Attributes to a Product

Setting Values
Step 3. Add variations
To add a variation, go to Variations section in the Product Data meta box.
Manually Adding a Variation
- Select Add variation from the dropdown menu, and click Go
- Select attributes for your variation. To change additional data, click the triangle icon to expand the variation.
- Edit any available data. The only required field is Regular Price.
- Save Changes.
Editing Many Variations
If you have more than 10 variations, use the buttons to navigate forward and backward through the list. Each time you navigate to a new set of variations, the previous set are saved. This ensures that all data is saved.
Setting Defaults
We recommend setting defaults you prefer on variations. In the example, we have no defaults set, so users can pick any color and size right away from the product page. If you want a certain variation already selected when a user visits the product page, you can set those. This also enables the Add to Cart button to appear automatically on variable product pages. You can only set defaults after at least one variation has been created.

Variation Data
The product data table has the same data sections as the simple product has, seen in the product details section on the product setup page, with the addition of a "variations" section. Each variation may me assigned individual product data. Once the variations have been created with the selected attributes, each variant can be expanded and assigned its own sku, price, stock info, and image as needed.
Bulk editing
You can bulk-edit variations by selecting the specific piece of data you want from the dropdown. In this example, I want to edit prices for all variations.
You can select Create variations from all attributes to have WooCommerce create every possible combination of variations (If you later add additional attributes, it may require the variables to be redefined for the variation combinations to work correctly.)

Source: Woo docs - Variable Product
Grouped / External
Adding a Grouped Product
A grouped product is created in much the same way as a Simple product. The only difference is you select Grouped from the Product Type drop-down.
Create the Grouped product
- Go to: WooCommerce > Products > Add New.
- Enter a Title for the Grouped product, e.g., Back to School set
- Scroll down to Product Data and select Grouped from the drop-down. The price and several other fields disappear. This is normal because a Grouped Product is a collection of ‘child products’, which is where you add this information.
- Publish.
The Grouped product is still an empty group. Having the choice to first create Simple products and add them to a Grouped product later; or first create a Grouped product and add Simple products later gives you flexibility to add Simple products to more than one Grouped product. To this Grouped product, you need to:
- Create products and add them
- Add existing child products

Add products to the Group
- Go to: WooCommerce > Products > Add New.
- Select the Grouped product you wish to add products to.
- Scroll down to Product Data and go to Linked Products.
- Select Grouped Products, and search for the product by typing - then click the products you wish to add - Update
- You can drag and drop to re-order the Grouped Products. Once you press Update, the new order will be shown on the product page.

Adding an External/Affiliate Product
Select ‘External/Affiliate’ from the product type dropdown. This removes unnecessary tabs, such as tax and inventory, and inserts a new product URL field. This is the destination where users can purchase the product. Rather than Add to Cart buttons, they see a Read More button directing them to this URL.
Source: Woo docs - Grouped Products | External/Affiliate Products
Virtual / Downloadable
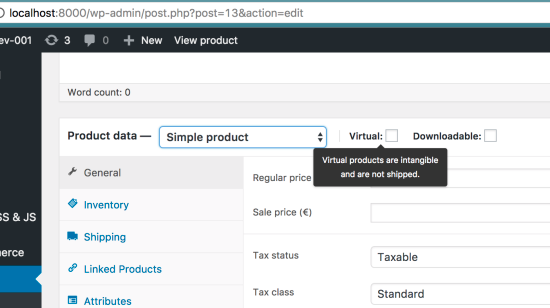
Adding a Virtual Product
When adding a Simple product, you can tick the Virtual checkbox box in the product type panel. With Variable products this checkbox is moved to each variation.
Enabling this, disables all shipping related fields such as shipping dimensions. A virtual product will also not trigger the shipping calculator in cart and checkout.
Simple Virtual Product
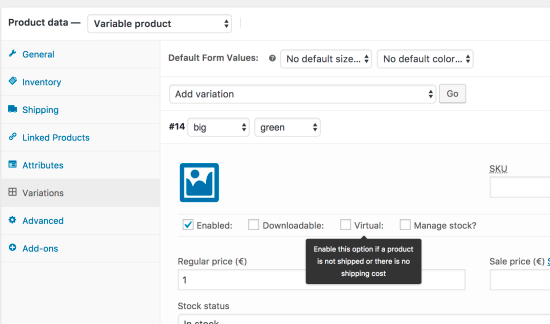
Variable Virtual Product
Adding a Downloadable Product
When adding a simple product, you can tick the Downloadable checkbox box in the product type panel. This adds two new fields:
- File path - Path or url to your downloadable file.
- Download limit - Limit on number of times the customer can download file. Left blank for unlimited downloads.
For maximum flexibility, downloadable products also incur a shipping cost (if, for example, you were offering both a packaged and a downloadable version of a product, this would be ideal). You can also check the Virtual box if the downloadable product is not shippable.
The ordering process for downloadable products is:
- Add to cart - User adds product to their cart.
- Checkout - Users checks out and pays.
- After payment, several things can happen depending on your setup:
- If items in the order are all downloadable + virtual, the order is complete.
- If items are physical and downloadable/virtual, the order is processing until you change it.
- Once complete, or if the option “Grant access to downloadable products after payment” is enabled, the user can:
- Be granted download permission
- See download links on the order received page
- See download links in their email notification
- See download links on their ‘My Account’ page if logged in

Simple Downloadable Product
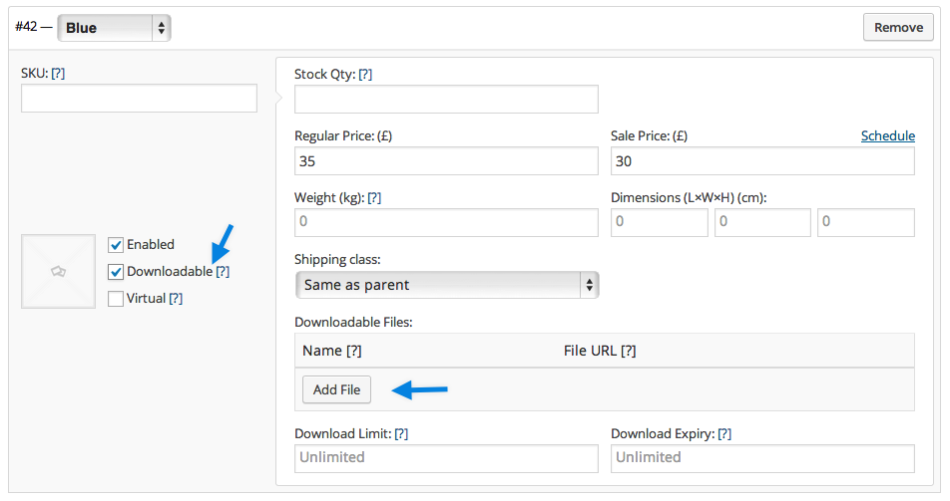
Variable Downloadable Product
Source: Woo docs - Virtual Products | Digital/Downloadable Product Handling
Table of Contents
Add a header to begin generating the table of contents
Next Steps
If you still need to add more functions, visit Woo Extensions, else start site design.