
Upgrade to WooCommerce
Overview

Step 1. Configure GD cORe
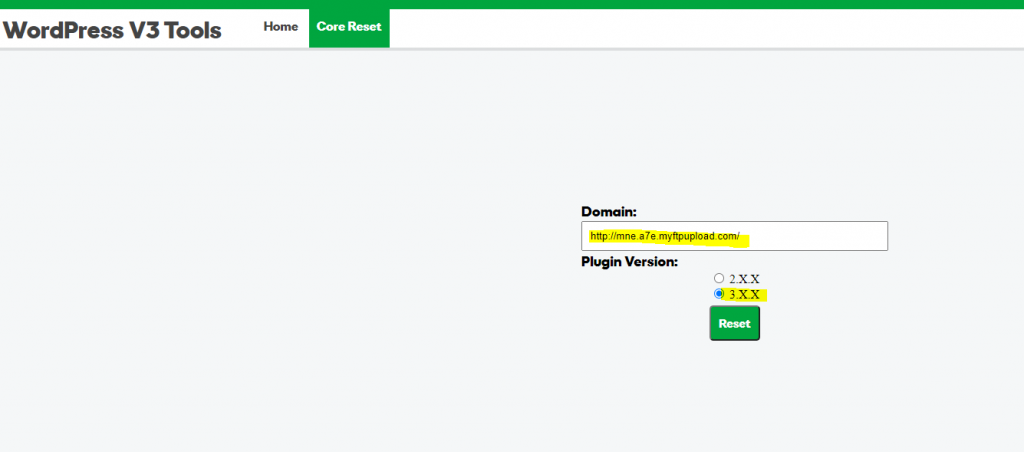
1a. Core Reset
- Make sure you're signed in to the WordPress Site
- Go to https://tools.v3.pwsgallery.com/?core-reset or go to https://tools.v3.pwsgallery.com/ and click "core reset" from the menu bar
- Enter the website's domain and select the plugin version. The plugin version for "PWS Core" would be 2.x.x and the plugin version for "GD cORe" would be 3.x.x so choose this based on the version currently installed on the site. You may want to update your PWS Core to GD cORe first before you reset it to avoid things breaking.
- Click reset
- The page will reload into GD cORe of the site with the setup screen ready
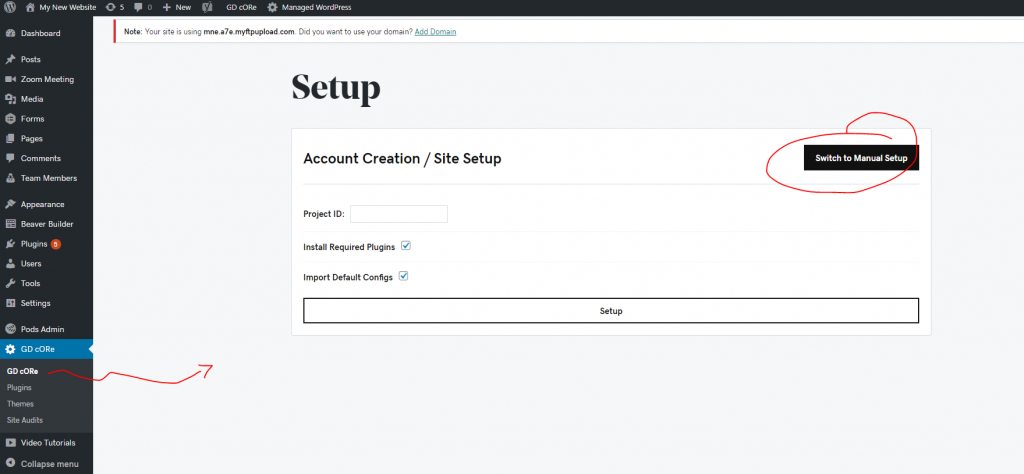


1b. Core Setup
- Select the site type to begin: set this to "Premium Store"
- Select the site region: set this to the region the site currently built in
- Check to install required plugins
- Check to import default configurations if needed otherwise leave this unchecked - this refers to settings like default accent colors and customizer settings. You should leave this unchecked if there are specific settings on a site already, especially if the site is live.
- Click "setup" - this may take a while
1c. Plugin Review
If the site times out for any reason, important plugins may not have gotten installed. Go to the GD cORe plugins tab and make sure the following items are installed and active. If they are not, please install and activate them:
- [ Beaver Builder Plugin (Agency Version) ]
- [ Beaver Themer ]
- [ PowerPack for Beaver Builder ]
- [ Ultimate Addons for Beaver Builder ]
- [ Gravity Forms ]
- [ Yoast SEO ]
- [ WooCommerce ]
- [ AJAX Search for WooCommerce ]
- [ WP Menu Cart Pro ]
- [ WooCommerce USPS Shipping ]
And then install and activate any other functionality that the site was currently using or intends to use now that its upgraded to the woo plan type, for example the events calendar, woo bookings, woo memberships, etc.
Note: If the site times out while installing something, don’t refresh the page, just hit the back button and click on the plugins tab under GD cORe again to see where its at.
Step 2. Configure WooCommerce
2a. Search & Cart
Reference the following step of the WordPress site setup flow: Woo Search & Cart [ 3 ]
Go through the steps, making sure they are installed and active and then checking the setup for each plugin:
- AJAX Search for WooCommerce [ 3a ]
- WP Menu Cart Pro [ 3b ]
2b. Woo Themer Layouts
Reference the following step of the WordPress site setup flow: WP Page Setup [ 4, 5 & 6 ]
Header
- Do this part unless its been asked to ignore header modifications.
- Edit the existing header's themer layout in the beaver builder editor.
- Either add a top bar that contains the search and cart OR switch the header out for a WooCommerce version of it.
Footer
Archive
Singular
2c. Products & functionality
Add Products and Enable any Additional Woo Functionality
- The customer should have provided worksheets for products as well as for all additional WooCommerce functionality
- Reference the product worksheet and the information on the product setup page to help answer any questions when adding products to the site.
- Reference the all plugins page and the woo extensions section to help answer any questions about additional functionality when setting it up.