
Approved Code Snippets
Quick reference sheet for approved code snippets. Before making use of any snippets, make sure you read the "Snippet Placement" section below.
Snippet Placement
The Theme Customizations Plugin
We use GD Core to house our theme, plugins and main WordPress components. GD core takes on the functionality of a child theme, so we don't actually get a child theme to use to add custom php to the site. Instead, we can install the "Theme Customizations Plugin" - A handy little plugin to contain your theme/plugin customization snippets.
This is a very clean, extremely basic plugin that doesn't require any updates. It keeps all of your changes in one location, independent of the other components that make up your web site. That means you can safely perform theme / plugin updates without the worry of losing your modifications as well as easily deactivating your customizations to check for conflicts. This plugin doesn't actually do anything on its own. It is purely a convenient place for you to store your own theme/plugin customizations.
How to set things up
Click here to download the Theme Customisations plugin
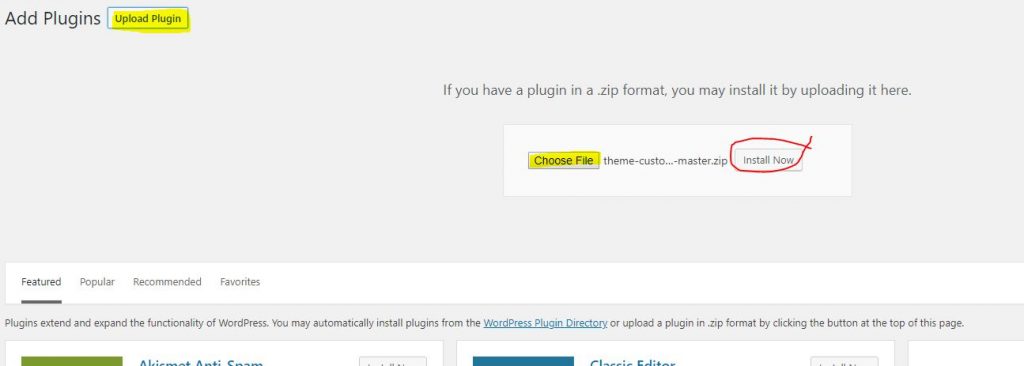
From the WordPress dashboard go to Plugins > Add New > click "Upload Plugin"
Upload the "theme-customisations-master.zip" file, click "Install Now" then click "Activate Plugin"
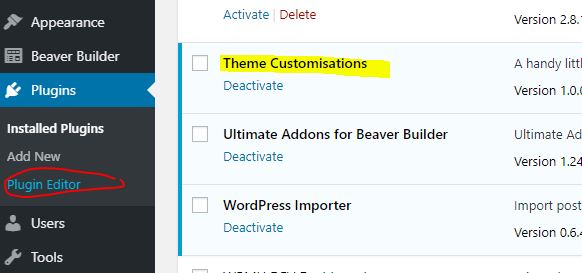
Once active, from the dashboard go to Plugins > Plugin File Editor
It may let you know of the risk of editing plugins, check the "I Understand" box and proceed
You should be on the "Edit Plugins" screen. Click the dropdown called "Select plugin to edit" > choose "Theme Customisations" > click "Select"
It is VERY IMPORTANT that you make sure you're editing the "Theme Customisations" plugin and not any other plugin
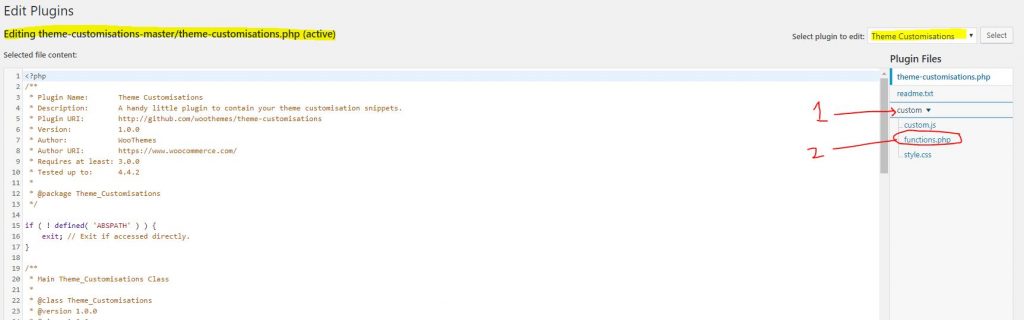
From the "Plugin Files" sidebar to the right, click the "custom" dropdown arrow
You should see three items listed under the custom dropdown: custom.js, functions.php and style.css
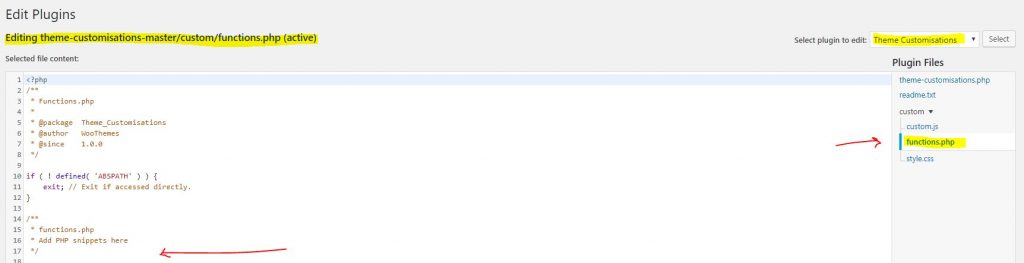
Beaver Builder customizer already includes a "Code" panel for custom JS and "Additional CSS" panel for custom CSS, so those two items will not be used here. We will only make use of the functions.php file for adding PHP snippets.
Click the "functions.php" file > add your snippet to the selected file content area under the comment that says "Add PHP snippets here"
NOTE: If you add a snippet that's missing something, usually you'll get a warning telling you to fix the mistake when you click the "Update File" button. Sometimes a snippet will be accurate so you won't get the warning and it will publish but it may clash with something else and break the site. If that's the case, you will have to FTP in and manually delete the snippet from the page using your FTP client.

2) Plugins > Add New
2a) Upload Plugin > Install Now
3) Plugins > Plugins Editor

4) Select plugin to edit > Theme Customisations
7) Click custom > functions.php
7a) Paste snippets here
Having trouble saving the snippet?
If you are getting an error while trying to save your snippet it may be due to the customer having a Sucuri Firewall on their site. If this is the case try whitelisting your IP address in the customer's Sucuri account.
Frontend Snippets
Source: WooCommerce Codex - Snippets Archives | Frontend Snippets
General Snippets
Source: WooCommerce Codex - Snippets Archives | General Snippets
Theming Snippets
Source: WooCommerce Codex - Snippets Archives | Theming Snippets
Table of Contents
Add a header to begin generating the table of contents