
Updates & Plugin Practices
If you are ever troubleshooting any issue at all with how something is not working or how there are errors of any kind visible on the front end, the very first step you should take is to make sure the PHP version, WordPress core, the active theme and the active plugins are all up to date. More often than not, updating these items and then subsequently clearing the cache will fix most errors. Important: Before updating anything, make sure you back up the website so you can restore it if anything tragic happens.
Activate or Deactivate Plugins
To Install and activate a plugin
- From the WordPress Dashboard > Click Plugins.
- Click Add New.
- Search for the plugin you want to use, and then click Install Now.
- Click Activate Plugin.
How you manage and use the plugin depends on its developer. You can view all of the currently installed plugins by clicking Plugins on the menu.


To deactivate a plugin
- From the WordPress Dashboard > Click Plugins.
- Select all of the plugins you want to deactivate.
- From the Bulk Actions menu, select Deactivate, and then click Apply.
Some WordPress plugins can slow your site's performance. Deactivating plugins and then testing your site's performance again can help you troubleshoot speed issues. Find resources on how to properly do this on the care resources page.
Helpful link: How to Install a WordPress Plugin
Properly Update Plugins
How it works
When there is a new update available for plugins, you will see the notification on the plugins menu in the WordPress admin bar. You can install these updates by visiting the Plugins page. You will see a notification below each plugin that has updates available.
If a plugin allows you to update from the yellow banner beneath the plugin name on the plugins screen, it means its either a free plugin, or it’s a plugin that the customer has a license key to use. If the yellow banner says something like "no updates are available" or "please enter license key to enable updates" then it means the plugin is not free or acquirable, and the customer must provide the license key for us to update it.

Before You Update, Read this!
- Before you update the plugin, it’s important that you click on the View version details link to see what changes the plugin author has made.
- This will keep you informed as to what changes were made should anything not work properly.
- Unless the version details specifically say security update, we usually wait one full week before updating the plugin. In this time, all errors usually get caught, reported, and fixed.
- If you have a heavy traffic site that is generating a lot of leads, then we recommend you to do the same.
Helpful links: How to Properly Update WordPress Plugins
Undo a Plugin Update
Using WP-Rollback
- Sometimes a plugin update can produce unexpected results like some plugin features may not work properly.
- In that case, first you will need to deactivate that plugin.
- If you can access the Plugins page in WordPress admin area, then simply click on the ‘Deactivate’ link below the misbehaving plugin.
- After that, you can install the WP-Rollback plugin.
- Upon activation, go back to the Plugins page, and you will be able to see a rollback option below each plugin.
- Clicking on it will allow you to rollback the plugin to any previous version.
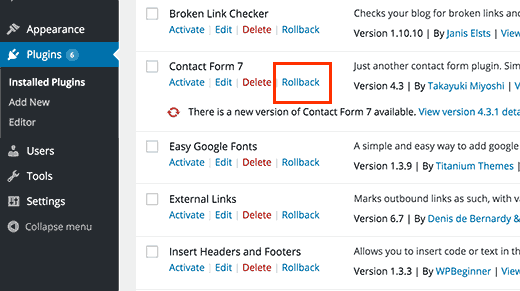
Table of Contents
Add a header to begin generating the table of contents