Skip to content

GD cORe

GD cORe – !important info
Gd cORe is our internal suite of approved plugins. Plugins are tested, approved and updated through the GD cORe interface. Unapproved and 3rd party plugins are updated through the WordPress Plugins page however, GD cORe approved plugins are only updated through GD cORe. You may see available updates for GD cORe plugins (e.g. Beaver Builder, Ultimate Add-Ons, PowerPack) appear on the WordPress plugins page but not in GD cORe. This is a normal for GD cORe. Updates may have been released from the plugin author but are not yet been tested and vetted for our Managed WordPress environment. Once updates from the plugin author have been approved they will become available for update through GD cORe.

How To Use It

GD cORe Automation

GD cORe is automatically installed on new WDS websites. The automation installs the GD cORe plugin and activates the core plugins for each plan type. For older WDS new builds, use the instructions below for downloading and setting up cORe (See Below).

Downloading cORe

Click here to download the core plugin to use on your build. Good news, if you install a version of the core plugin that is not the most recent, it will automatically show you that a newer version is available. You will be able to click upgrade from within the WordPress Account (See Below).


Setting Up cORe

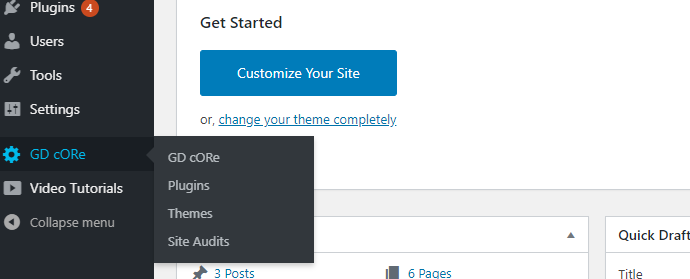
The setup is a breeze! Once you have installed the plugin, the same way you would any plugin, you can navigate to the GD cORe tab on the left side of the WordPress admin panel.

1a. Auto Setup

You will now be on the setup screen, that should look like Auto Setup (fig.1). 
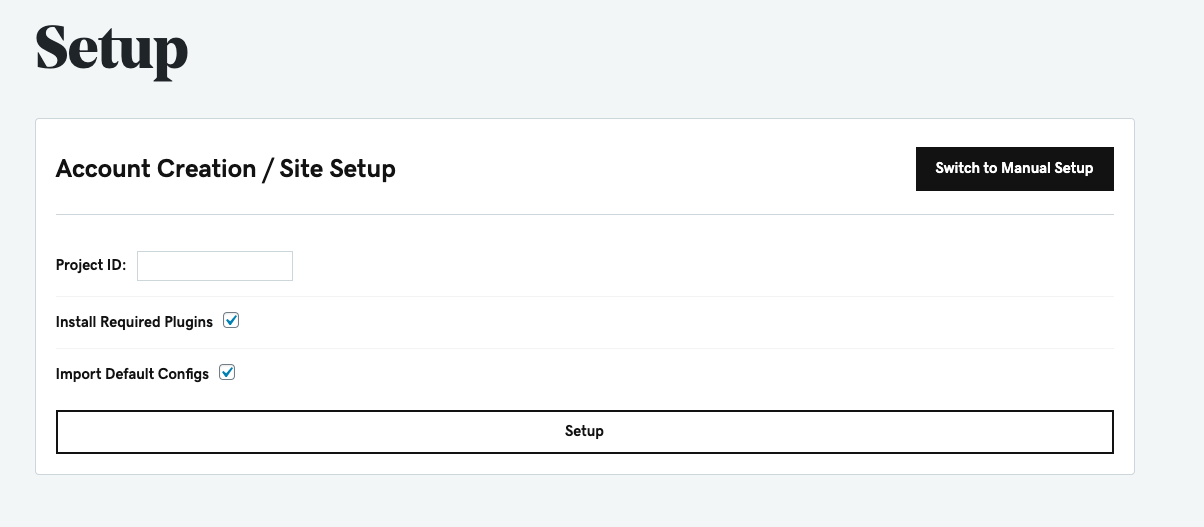
A new feature of GD cORe is that setup has been streamlined. For Internal builders, simply input the parent website JIRA ticket key into the Project ID field, and for our vendors input the parent vendor ticket key. This will automatically reach out to JIRA and fetch the plan type and market id for you. You will notice a black “Switch to Manual Setup” button, this is there for cases where the auto setup just seems to not be working.

1b. Manual Setup

Assuming the auto setup is not working for you, simply click the switch to manual setup button. This page should look like Manual Setup (fig.2). 
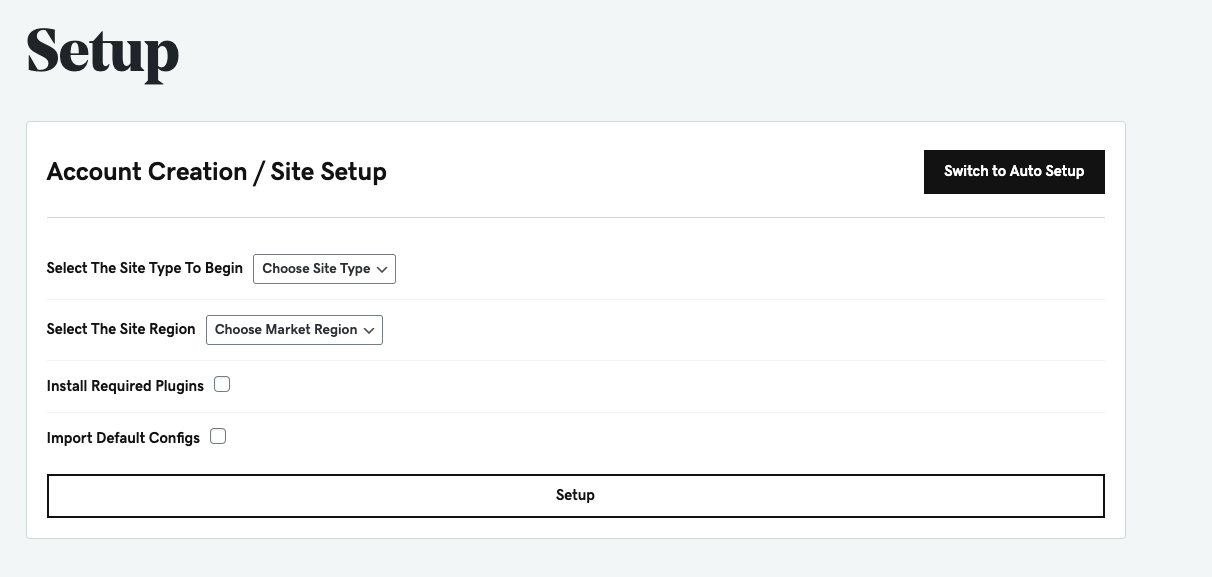
From this page, select the site type and site region that this build belongs to. It is important that you select the correct one as this determines which plugins show for download in the core admin on this build. You will also see this page contains two new options.

2. Install Required Plugins

As you can see in the screenshot above there is a checkbox that says “Install Required Plugins” if you check this box, on setup it will automatically install all plugins and the theme required, for the site type and region selected. A new feature of GD cORe is that it will also automatically configure any plugin we have a config preference on.

3. Import Default Configs

Another new option during the setup screen is an option to import default configurations. This will automatically set all WordPress settings and theme settings to our preferences. These are things such as showing new tab options when creating a nav item or setting line height in beaver builder theme.


The GD cORe Dashboard

Aside from the 3 regular cORe pages: plugins, themes and site audit, there’s now a dashboard page for GD cORe itself.

This dashboard displays the following 4 widget-like boxes:

  1. Plugin Settings – information about the version and status of the cORe plugin
  2. Website Settings – the site’s settings pulled directly from its hosting page in the customer’s GD account (a quick place to check whether the CDN is enabled/disabled before the new build)
  3. Tools – the best feature of all, being able to flush 3 different caches all with one click
  4. Unsupported Plugins – this matches the list of plugins that are “approved” with the plugins that are installed on the site, and shows you the ones that aren’t on the list. This will make it easier for customers to see when they install out of scope plugins to their sites, that we won’t support them. This also creates an easy “all in one” place to see all the unapproved plugins and disable them one at a time if necessary.

Note: A plugin being “unsupported” doesn’t always mean its out of scope for us to use. For example, in the image to the right, notice how CoBlocks and WordPress Importer are showing up as “unsupported.” We are allowed to use CoBlocks for page/post content if we so choose, and the Importer is built in to WordPress which we can enable/disable once we’re done with it.


Installing a Theme (if auto install was skipped)

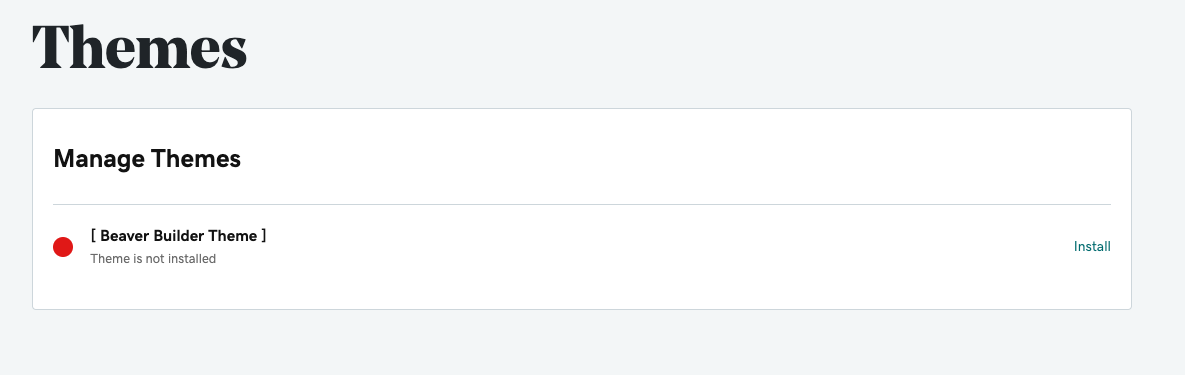
Currently, only the Beaver Builder theme is offered. To use this theme, click on the themes tab on the left WordPress admin under the GD cORe menu. Once on this page you will see the theme you are looking for and you simply need to click the install link.

This will take a moment as it is making a call to the API to fetch the theme and then installing it to the WordPress account. Once successfully installed the circle icon next to the theme will go green.


Installing a Plugin

Installing a Plugin is very similar to installing a theme. To start, click on the Plugins tab on the left WordPress admin sidebar under the GD cORe menu, here you will see a list of plugins available for install. The plugins here are just the premium plugins we offer based on this customer’s site type.

If you need to install any free non premium/ non required plugins, that is still done from the default WordPress plugin page. On this page however, you will be able to install, update and deactivate premium plugins. There are 4 different status on this page and these can be seen under each plugin’s name (see statuses for more details). To install a plugin that is not already installed, find it in the list and on the right click the install link. It will follow the same process of calling the API, then getting the plugin and installing it. It should auto activate. If not, just find it again and click the activate link.

Your plugin is now installed and ready for use.

Bulk Actions

You will now see in GD cORe there is a bulk actions option. This new feature allows you to perform all the actions you can do on a single plugin but on many plugins at once.

All you need to do is select the checkbox on the right for the plugins you want to take action on. Then select the bulk action at the top and click apply. 


Statuses

Currently there are 4 statuses built into the plugin screen and they are represented with text and specific colors. These statuses are:

  • Plugin is not Installed – Red
  • Plugin is not active – Yellow
  • Plugin is active – Green
  • Plugin is active but need an update – Orange

For more info on plugin updates see plugin updates.


Plugin Updates

Great news, all premium plugins can be updated right from within WordPress, gone are the days of reaching out to get a zip file and having to uninstall and reinstall a premium plugin. All non premium plugins will still use the default WordPress plugin page for updates, however premium plugins will need to be updated from the GD cORe plugins page. If a premium plugin is installed and has a update available, it will show a orange circle icon next to the plugin’s name and the action link on the right will say update instead of deactivate. Simply click this update link and the plugin will get updated. 

GD cORe, plugin updates and plugin notifications

GD cORe is a plugin that is automatically installed on all new WDS websites. GD cORe is used to update premium (paid) plugins without the license keys that are normally required to update them. License keys are NOT required to update the premium plugins that are included with your plan.

You can view and update the list of premium plugins included with your build plan by going to the WordPress Dashboard > GD cORe > Plugins.

Not all plugins listed in GD cORe must be installed.

Any plugin that you are not using should be left uninstalled.

It is normal for plugin update notifications and banners to display in the WordPress Dashboard. Some of these notifications and banners are due to the custom nature of the GD cORe plugin and can be ignored.

It is normal to receive email notifications regarding plugin updates. You can change the email that these notifications go to by updating the admin email address on your WordPress website (requires email confirmation) by going to the WordPress Dashboard > Settings > General > Administration Email Address. You can also adjust your personal email inbox settings to block or discard these email notifications if you feel like they are too frequent (WDS does not provide support for personal email settings and configurations).

Free plugins (non-premium) can be updated outside of GD cORe using the default WordPress plugin list by going to the WordPress Dashboard > Plugins > Installed Plugins > Click “update now” for the plugin you wish to update.

In general, it is a good idea to keep all plugins up to date, however, updating plugins does come with a small risk of breaking the website. All plugin updates available through GD cORe have been vetted and tested to ensure minimum risk and are generally safe to update on your own.

The current plugin versions available in GD cORe may NOT be the most up to date versions available from the plugin developer. It takes time for our team to test and vet new plugin versions for conflicts before uploading them to GD cORe. Once a new plugin version has been successfully tested and is working correctly it is uploaded to GD cORe and is available for updating.  

In general, our plugins do NOT automatically update. You can submit a Marketing Services ticket at any time to have us update the plugins for you.

For a full list of available plugins by plan type please visit our Website Features page. Please note that any plugin outside of this list will NOT be supported by the WDS department.


Site Audit with Google Lighthouse

We implement Google Lighthouse on all of our builds to test their performance, to ensure we are giving our customers quality websites.

Google Lighthouse audits overall site performance, encompassing many items like site speed, accessibility and SEO.

Every audit of Google Lighthouse will detail what items a site is doing poorly in, so we can properly troubleshoot the site’s overall performance to above a threshold of 75%.


Updating The Core Plugin

GD cORe continues to offer self updating through the default WordPress plugin page. Simply go to Plugins, find the core plugin and if an update is available, click “update now“. If you know one should be available but its not showing, simply clear the websites cache and try again. 

If you try to open GD cORe, but it has an update available, it will require you to update it first before allowing you to use it. The screen will tell you that cORe needs an update, and the only available option will be to click the provided button titled “plugins page,” from where you will update core and then head back over to continue with your work.


The GD cORe Admin bar

A new feature in GD cORe is the addition we made to the default WordPress admin bar. We now have a GD cORe option that allows you to get wherever you want to go within GD cORe from any page. You can also see if the MWP CDN is enabled from here along with being able to flush cache from here as well. 


FAQ/Troubleshooting

I Setup The Wrong Account Type

We understand sometime people make mistakes and it really is no big deal. If you setup an account under the wrong account type, simply make sure you are logged into the WordPress admin already, then navigate to the following link. Once you are on this page, paste in the base domain name of the account you setup wrong for example: http://013.143.myftpupload.com/ and select the version option that matches the version you have installed on the customers site and click reset.

This will bring you back to the same account where you are now back at the setup screen.


Customer Needs To Be Moved To a New Hosting Account

If you have a customer who has been moved to a new MWP account, Please visit http://x.co/pwsosd > Select System Issue > Select PWS CORE plugin from the dropdown > In the Description field please state that you have a customer who has moved to a new MWP account and their user needs updating in PWS Core. Can you assist?

Error: User already Exists

When setting up a hosting account on cORe, if you get an error like the following screen shot:

This means that we have already setup a user for this hosting account in the past. So one of two things happened:

  • Someone deleted all the cORe settings from the database
  • This account has been restored to a point before cORe being installed, again removing all the db settings for core. 

Either way, what needs to happen is that this user needs to be removed from our API so that they can be re added. Please submit a Technical Clarification so our team can remove the user.


Plugins Installed But Not Showing Installed In cORe

This means you are most likely on an older version of cORe and you need to update to a newer version. As of version 2.3 we introduced a plugin alias name system so that when a plugin is installed we can check for all its alias names(Plugins tend to change their name).

Simply upgrading to the newest version should resolve this issue. Upgrading can be done from the main WordPress plugin screen, clear cache and check if an update is available. 


The Plugins Page Says “Token Expired” – Reauth

This simply means the user’s access token key was removed or expired, there will be a Reauth button there, just click this and it will regenerate this key. Most of the time after cORe has an update, you’ll notice that the plugins tab of cORe will have a Reauth button, that when pressed, normally loads core and its updateable plugins.

However, there will be times when you try to press this reauth button and it wont work. If the reauth button doesn’t work, you’ll need to reset cORe. Upon resetting cORe, the plugin settings will have to be reconfigured, so have the Plan Type and Region information available before you do the reset. To reset core, navigate to the following link. Once you are on this page, paste in the base domain name of the account, for example: http://013.143.myftpupload.com/ and click reset.


No Update is showing for cORe But It Is Out Of Date

On MWP in order to see a plugin update available you sometimes need to clear the cache. Go to the black bar at the top of your screen and hover on the GoDaddy tab and click clear cache. Once this is done refresh and it should now show!

Table of Contents
    Add a header to begin generating the table of contents
    Scroll To Top