
Woo Overview
Learn about the WooCommerce Dashboard and how to get everything set up in the Woo settings back-end.
General Settings
General Tab
Dashboard > WooCommerce > settings > general tab > fill out the store address information, tell it where you sell and where you ship to, enable taxes, and set your currency
Products Tab
dashboard > WooCommerce > settings > products tab
- Products Tab > General
here's where you assign a shop landing page, select units for measurement and enable/disable reviews or ratings - Products Tab > Inventory
here's where you assign global stock management options - if you have products that need their stock managed differently, you can manage stock on those individual products which will override the settings in this area - Products Tab > Downloadable Products
here's where you can select a download method for virtual products and control their access - Product Display Option
in the video below you'll notice the product display options being a part of the products tab - with the latest update of woo, these settings are now in the customizer under WooCommerce

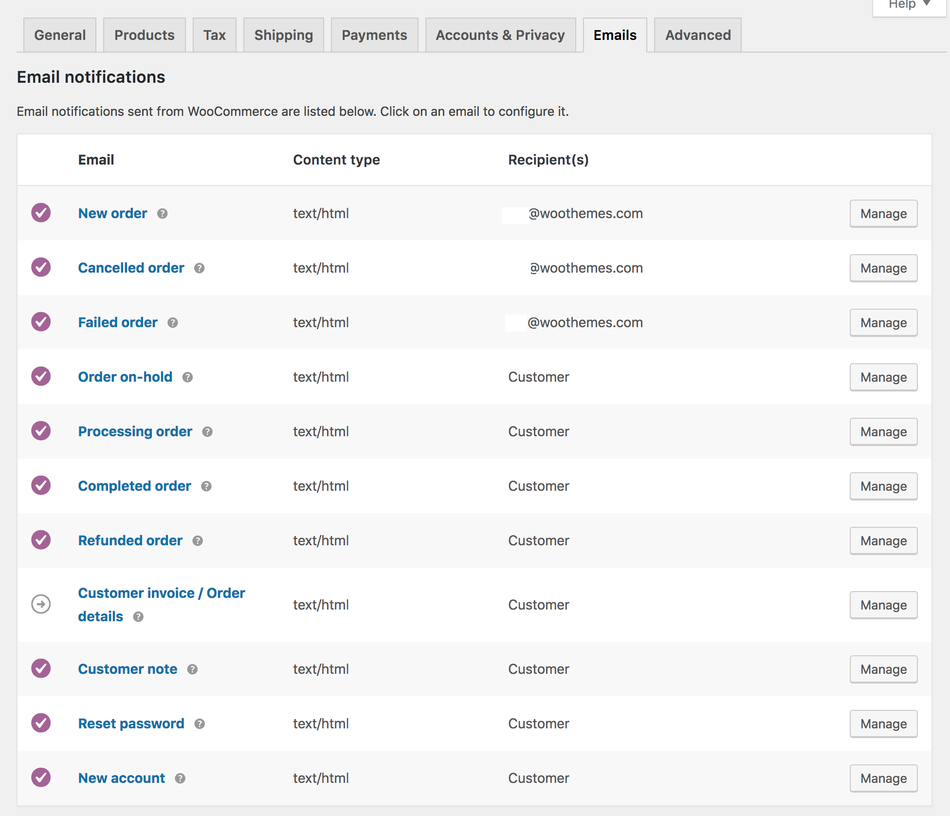
Emails Tab
dashboard > WooCommerce > settings > emails tab
- Emails Tab > Notifications
this section controls all the order-related email notifications sent by WooCommerce to both admins and customers - Emails Tab > Sender Options
you can assign a specific name and email to display in the "from" fields in all emails sent out by Woo, if the information they want here is different from their default admin info - Emails Tab > Template
this section lets you customize the WooCommerce emails template colors, header image and footer text - its good practice to change the default purple Woo color in this area to the main accent color being used on the site

Advanced Tab
dashboard > WooCommerce > settings > advanced tab
- Advanced Tab > Page setup
this is where you assign components to their designated pages - this is discussed in detail on the Woo Components page - Advanced Tab > Checkout Endpoints
endpoints are appended to your page URLs to handle specific actions during the checkout process - they should be unique - the default endpoints are found in this section and can be changed if necessary - usually we just leave them as is - Advanced Tab > Account Endpoints
endpoints are appended to your page URLs to handle specific actions on the accounts pages - they should be unique and can be left blank to disable the endpoint - Advanced Tab > APIs
these tabs are generally not touched unless there's a specific request to do so - we would enable Woo API if we wanted the store to tie into another store platform like printful, where it would import products or stay synchronized with the customer's products on the platform
Plugin video resources & Woo Documentation
Accounts & Checkout
Accounts & Privacy Tab
dashboard > WooCommerce > settings > accounts & privacy tab
- Account Settings
in this section you can dictate whether customers can checkout as a guest or if they have to create an account to make a purchase - Privacy Policy
here's where you can designate a page for privacy policy text and change the sentence to display it during checkout or account registration - the checkout text can also be changed in the customizer under WooCommerce - Personal Data Retention
choose how long to retain personal data when it’s no longer needed for processing - leave the following options blank to retain this data indefinitely

Payments Tab
dashboard > WooCommerce > settings > payments tab
The default installed payment methods are displayed in this area - if you enable PayPal, you must have the PayPal Identity Token ready to accept payments, as well as PayPal Live API username, password & signature in order to receive refunds - enable IPN to receive notifications


Plugin video resources & Woo Documentation
Taxes & Shipping
Tax Options
dashboard > WooCommerce > settings > [ general tab > "enable taxes" > save > ] tax tab
The Tax tab displays several options that can be set to suit your needs — settings you choose are based on the tax jurisdiction under which your store is located.
- Prices Entered With Tax
this option is perhaps the most important when managing taxes in your store, as it determines how you input product prices later on - “Yes, I will enter prices inclusive of tax” means that all catalog prices are input using your store’s base tax rate - “No, I will enter prices exclusive of tax” would mean that your catalog prices need to be tax exclusive
- Calculate Tax Based On
this setting determines which address is used for tax calculations - customer billing address, customer shipping address (default), store base address - if you use store base address, taxes are always based on your store location and not your customer’s location - Additional Tax Classes
in most cases, you want to use the default Standard class - to get started, we include Standard, Reduced Rate and Zero Rate tax classes - each class is listed at the top of the tax settings page – click a class to view tax rates assigned to the class - Display Prices in the Shop
this option determines how prices are displayed in your shop/catalog - choose from inclusive/exclusive tax display - usually people don't like to display taxes until checkout - Display Prices During Cart and Checkout
this option determines how prices are displayed in your cart and checkout pages – it works independently of your catalog prices - choose from inclusive/exclusive tax display

Setting up Shipping Zones
dashboard > WooCommerce > settings > shipping
A Shipping Zone is a geographical area to which you ship items. You can get as specific as you need, right down to regions and zip codes, or you can leave it more general – whichever suits you best.
Customers only see the methods available for their address and corresponding zone. Each customer matches only one zone. Add as many zones as you need, with each zone containing multiple shipping methods.
Adding a new zone
- Click the Add shipping zone button
- Enter a descriptive Zone Name, and select Zone Regions that apply. Regions can consist of: a) Countries, b) States, c) Continents
- Select Limit to specific zip/postcodes (if applicable) to further narrow which customers match this zone. For example, you can set a local zone with a specific set of postcodes (one per line); a range of postcodes (e.g. 90210…99000), or use wildcards (e.g. CB23*)
- Select which Shipping Methods are available to this zone > Save changes
Adding shipping methods to zones
- Hover over the Shipping Zone you wish to change, and select Edit > Scroll down to Shipping Methods on the screen that appears
- Disable an existing Shipping Method by using the button
- Or select Add Shipping method to use a different one > Save changes


Plugin video resources & Woo Documentation
Managing Orders
Order Status
Orders are created when a customer completes the checkout process, and they are visible by Admin and Shop Manager users only. Each order is given a unique Order ID. An order also has a Status. Order statuses let you know how far along the order is, starting with Pending and ending with Complete. The following order statuses are used:
- Pending payment – Order received (unpaid)
- Failed – Payment failed or was declined (unpaid). Note that this status may not show immediately and instead show as Pending until verified (i.e., PayPal)
- Processing – Payment received and stock has been reduced – the order is awaiting fulfillment. All product orders require processing, except those that only contain products which are both Virtual and Downloadable.
- Completed – Order fulfilled and complete – requires no further action
- On-Hold – Awaiting payment – stock is reduced, but you need to confirm payment
- Cancelled – Cancelled by an admin or the customer – stock is increased, no further action required
- Refunded – Refunded by an admin – no further action required

Viewing Orders
- When you start taking orders, the Orders management page begins to fill up.
- View these at: WooCommerce > Orders
- Each row displays useful details, such as order number and customer name, date of purchase, order status, shipping address, and purchase total
Editing Orders
- click the order number and customer name to see the Single Order page, where you can also Edit order details, Update Status, and Add Notes
Editing/viewing single orders
From the Single Order page not only can you view all order data, but also edit and update.
- Change the order status
- Edit order items – modify the product, prices, and taxes
- Stock – Reduce and restore stock for an order
- Order Actions – Email order details to customer (handy if manually creating an order for your customers) or Regenerate download permissions
- Modify product Meta to edit product variations by removing and adding meta
- Apply coupons. You will need to know the coupon code to apply to the order. Coupon usage counts are tracked, and coupons can also be removed from orders. Note: the order must be unpaid for coupons to have an affect
- Add fee. You can enter an amount or percentage to add a fee to an order. Negative fees will apportion taxes between all other items, and will not make the cart total go below zero
Order/Customer Notes
- The Order Notes panel displays notes attached to the order and can be used for storing event details, such as payment results or reducing stock levels, or adding notes to the order for customers to view.
- Some payment gateways also add notes for debugging.
- Notes can be a powerful tool for communicating with customers - Need to add a tracking number for shipping? Is stock delayed? Add a customer note, and they are automatically notified.


Adding an Order Manually
- Use Add New at the top of the page. The Single Order page appears > Input customer details, add line items, apply coupons, apply fees and calculate totals.
- Set a status for the new order, e.g., If it needs to be paid, use ‘Pending’ > Save > Use the Order Actions dropdown to Email order details to the customer with payment instructions.
- Note that adding an order manually has no effect on stock/inventory. You would need to manually subtract or adjust inventory for those items.
WooCommerce Refunds
With WooCommerce 2.2 and newer, you can now process refunds directly from within an order automatically if your payment gateway supports it or you can do so manually.
- Automatic Refunds
If your payment gateway supports automatic refunds, there will be new settings in your gateway’s settings to fill in. Make sure those are setup correctly or refunds won’t work as they should. Refunds extend to products, taxes, and shipping fees and can be processed through your order page. - Manual Refunds
Refunding manually allows you to utilize any WooCommerce payment gateway, regardless of automatic refund support. This will not automatically send the refund to your payment gateway, but allow you to mark the order as refunded on the order. Refunds extend to products, taxes, and shipping fees and must be processed directly with your Payment Gateway.
Plugin video resources & Woo Documentation
Table of Contents
Add a header to begin generating the table of contents