
How To Use Pods
Now that you've been introduced to the Pods plugin, its relationship to posts and taxonomies and why you'd need to use it, this page will teach you how to use it to create custom post types, taxonomies and how to add custom fields. Once you're able to create a custom post type, you will learn about Pods & Themer - how to use Beaver Themer to create a template for your post type with things like "Field Connections" and "Magic Tags."
Getting Started
Installation
To start using Pods, you are going to need to download two plugins: Pods and Pods Themer Add-on. These have been linked in the buttons above. You can download them and install them or search for them in the "Add New" plugin section of the dashboard. Once they are installed and active, you should see a "Pods Admin" link in the dashboard under the Tools and Settings links.


Planning Your Pods
How to Plan Your Custom Content Types
Before you start making pods, you're going to want to figure out what you're going to make - what your custom post types will be called, what taxonomies it will need, whether the taxonomies will need to be hierarchical or not, etc. The following steps are extremely important.
Step 1 - The User Experience
The first thing to keep in mind, is that your Content Types are going to be used day-to-day by the website’s user, which may not necessarily be you. Think about your user’s workflow. This is going to be very different to a development workflow. Put yourself in the position of your user. How are they going to create content within this website? What sort of content is going to be output on the front end? The type of content that your user needs is going to determine what you create. Sit down with a piece of paper and sketch out the user’s workflow. Figure out how they’re going to create and use your content types.
Step 2 - The Visitor Experience
As well as thinking about your user, you need to think about the content that your website’s visitor will see on the front-end of the website.
Ask yourself some questions:
Step 3 - Start Planning
With the advice from Step 1 and Step 2 in mind, start planning out your content. You’re going to need to decide the following things:
- What Custom Post Types do you need on your website?
For example, on an Ecommerce website, the Custom Post Type needed would be "Products."
- How should the content be organized?
You may decide that you want to create more than one Taxonomy for a Post Type. For example, for an Ecommerce website you might wish to have the hierarchical taxonomy "Product Type" to categorize it and the non-hierarchical taxonomy "Brand" to filter it by.
- What additional data will enrich your content?
You can create Custom Fields which are meta data attached to your Content. Examples for an Ecommerce website might be "price" or "stock quantity".
Remember that while Taxonomies are ways to group Post Types together, Custom Fields are a mechanism for attaching individual data to your content. For example, a book review website might need:
Pods Documentation: Planning Your Custom Content Types
Create a Custom Post Type
Dashboard > Pods admin
Add New pod
Navigate to Pods Admin > Add New and click on the Create New button
Content type
From the Content Type drop-down menu, ensure that Custom Post Type (like Posts or Pages) is selected.
Label
Give your Custom Post Type a Plural Label and a Singular Label


Manage Fields Tab
Add fields to your Custom post type - To add a field, click on the Add Field button.
Basic Tab
fill out the label, name, description, select a field type
Additional Field Options Tab
choose how you want to format your field based on the field type you selected (if you want a user to be able to embed YouTube videos in the field, select "WYSIWYG" as the field type and "enable oEmbed")
The Advanced Tab
even more options that you may wish to use to control design and defaults and to control who sees the field
Update
When you’re happy with your field click Update Field. Make sure you save pod if you plan to leave the page and come back later.


New Field - Basic Tab
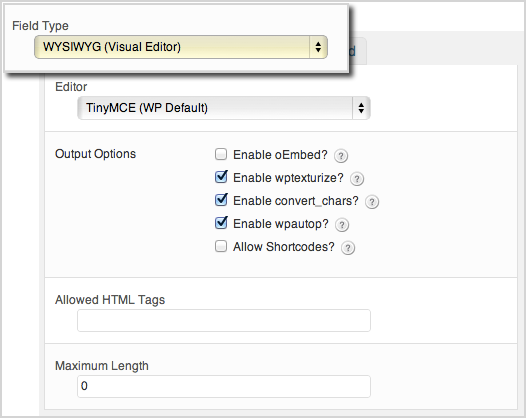
Field Type - WYSIWYG

Field Type - Currency
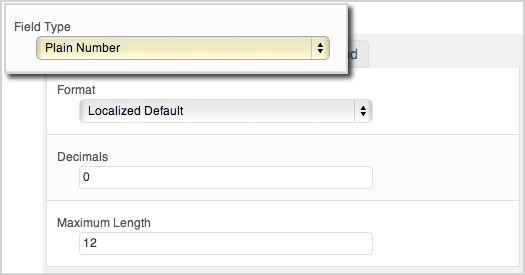
Field Type - Plain Number
Admin UI Tab
Gives you fine-tuning options for your Custom Post Type’s admin menu. You can choose a custom menu icon for your new post type in this tab, the default icon will be a thumbtack. You don't have to do this, but if you want to change the icon to something else, you can paste the WordPress Dashicon name in the "Menu Icon" field. For example, to use the empty star icon, use "dashicons-star-empty".
Also, make sure the field for "Show Admin UI" is checked so that you get the option to see "All [Your Post Type]" in your dashboard just like you can see "All" regular posts or pages.
Advanced Options Tab
Provides fine-tuning for how your Custom Post Type acts. There are many options on this tab that may or may not be important to you based on the kind of post type you're creating and how you expect it to function. The little "?" marks next to each field do a good job of telling you the fields do. If you're interested in a more in-depth understanding of the Advanced Tab fields, read the pods documentation on custom post types OR the WordPress codex function reference for registered post types.
Include/Exclude Post Functionalities
Choose which functionality the Post Type supports, like title, excerpt, and featured image.
Associate taxonomies with your Custom Post Type
Select which categories your post type can be organized by. Ignore this step if you plan to create a Custom Taxonomy specific to this post type, you can handle this part once you create that Taxonomy.
Save Your Pod
Whenever you’re finished with your fields and your options click "Save Pod". Your Custom Post Type will be available in your dashboard - it will appear like posts do.
Rest API
You'll notice that the last tab on each field, as well as the last tab on the whole pod say "REST API." Its very important that you enable REST API for both, each field AND for the pod as a whole. This feature enables the pod and the fields to integrate with the front end of WordPress - the editor and post modules.
- When REST API is enabled for the whole pod, it will allow Gutenburg editor to work with the pod.
- When REST API is enabled on fields, they tend to show up without issue when displaying them in a posts module on an archive.
So before you go to add a new post in your newly created pod, make sure REST API is enabled for each field and for the pod as a whole:
- For each field, check both boxes: "Read via REST API?" and "Write via REST API?"
- For the overall pod, in the REST API tab, check "Enable" then, check "Show All Fields (read-only)" and "Allow All Fields To Be Updated"

field REST API tab

overall pod REST API tab
Adding a "New" Custom Post
When you save your pod, you'll see it appear in the dashboard under your existing post types.
Don't worry about viewing it yet, it won't look right and most of your post type's custom fields will not show up if you view it the way it is. You will handle the visual side of your custom post type in the "Pods & Themer" section.

Pods Documentation: How to Create a Custom Post Type
Create a Custom Taxonomy
Dashboard > Pods admin
Add New pod
Navigate to Pods Admin > Add New and click on the Create New button
Content type
From the Content Type drop-down menu, ensure that Custom Taxonomy (like Categories or Tags) is selected.
Label
Give your Custom Taxonomy a Plural Label and a Singular Label

Manage Fields Tab
If you’d like to add fields to your Custom Taxonomy (Term Meta), you would add them under the Manage Fields Tab, just like you would within a regular Custom Post Type. This isn't necessary for taxonomies. A good example of how this can be useful is when you want to add an image field to the taxonomy as is seen built into WooCommerce's product categories.
Admin UI Tab
Allows you to customize the admin menu appearance of your custom Taxonomy. You can choose to show the taxonomy in the admin menus and apply the default taxonomy UI so you can see it on the posts it applies to in the dashboard.
Advanced Options Tab
This tab is important for Custom Taxonomies. The two fields listed below will affect how your taxonomy is going to function.
Hierarchical or Flat?
Choose whether your taxonomy is going to be hierarchical, like categories, OR non-hierarchical/flat, like tags.
Associated Post Types
This is where you associate a taxonomy with a Post Type. If you want your Custom Post Type from the section above to be associated with the Custom Taxonomy you are creating now, select the checkbox next to your Post Type's name. (Once you save your taxonomy pod, if you then go back and look at your custom post type from earlier, you'll see your new custom Taxonomy in the Post Type's Advanced Options tab, and it will already be checked.)

Rest API
You'll notice that the last tab on each field, as well as the last tab on the whole pod say "REST API." Its very important that you enable REST API for both, each field AND for the pod as a whole. This feature enables the pod and the fields to integrate with the front end of WordPress - the editor and post modules.
- When REST API is enabled for the whole taxonomy pod, it will allow the taxonomy to show up like regular post categories on the side of the Gutenberg editor when adding a post associated with that taxonomy.
- When REST API is enabled on fields, they tend to show up without issue when displaying them in a posts module on an archive.
So before you go to add a new taxonomy in your newly created pod, make sure REST API is enabled for each field and for the pod as a whole.
Adding "New Terms"
When you save your pod, you'll see it appear in the dashboard when you hover over the post types its associated with - like the link to categories appear when you hover over regular posts.
Don't worry about viewing it yet, it will appear like a regular posts category and may even be empty if no posts have been added to it. You will handle the visual side of your taxonomy archive in the "Pods & Themer" section.
Pods Documentation: How to Create a Custom Taxonomy
Extend a Post Type
Dashboard > Pods admin
Instead of creating a new Custom Post Type, you can extend a Post Type already available in your WordPress website by adding on to it. You may wish to extend the WordPress defaults, or extend a Post Type created by another plugin or theme.
Add New pod
Navigate to Pods Admin > Add New and click on the Extend Existing button
Content type
From the Content Type drop-down you can select from the following: Post Types, Taxonomies, Media, Users, Comments
Post Type
From the Post Type drop-down you can select the Post type you wish to extend: e.g. Posts, Pages, Books, Products


You’ll now be able to add fields, just as you did with your custom post type. You can revisit the steps above in the Custom Post Type section about how to add fields.
Pods Documentation: How to Extend a Post Type
Table of Contents
Add a header to begin generating the table of contents
Next Steps
Once you've created your custom post type and taxonomy, learn how to create themer templates to display them.