
Maintenance Mode and Coming Soon Pages
October 19, 2020 | Beaver Builder, Website Care, WordPress
Every now and then we get requests to put a Maintenance Mode or Coming Soon page up while we are building or updating. The good news is, this is built in to PowerPack! Here are the steps on how to enable and configure this setting.
Step 1: Create your Page
You should go to pages and click add new to set up a new page. Give it the name “Coming Soon” or “Maintenance Page” for clarity.
Note: Check to see if there is already a Maintenance Page or Coming Soon page in place before creating a new one.
These pages should have very little content on them and should never be complex. It is good practice to have the company name and/or logo, a short message, and any contact info (email, phone, social media, etc.) for site users to get in touch with the business while the site is temporarily down. Go ahead and build this out in Beaver Builder as you normally would.
Hint: UABB Info Box is great for this situation.
Because PowerPack will use this as the landing page, the header and footer will not display. Keep this in mind when you make your page. You might find that doing a full height row is beneficial in this situation.
Step 2: Enable Maintenance Mode
In the WordPress dashboard, in the black menu on the left side, hover over Settings and click on “PowerPack”.

On the next screen, at the top of the page click on the tab “Maintenance Mode”.
From the drop down select “Yes”.
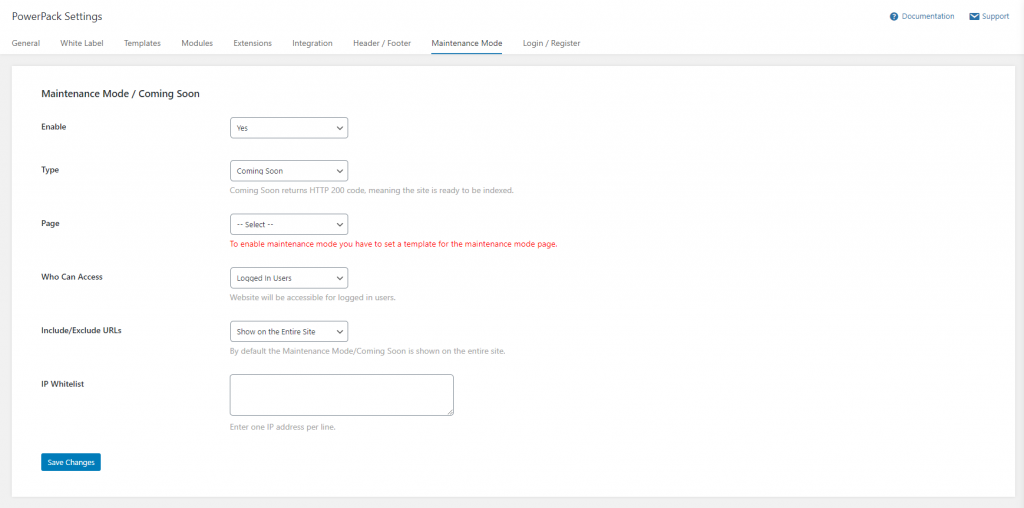
You will be given a few options here.
For the “Type” dropdown you will select whatever is appropriate for the customer at the time.
- Coming Soon – returns HTTP 200 code, meaning the site is ready to be indexed.
- Maintenance Mode – returns HTTP 503 code, so search engines know to come back a short time later. It is not recommended to use this mode for more than a couple of days.
For the “Page” drop down, you will select the page you created in Step 1.
“Who Can Access” should ONLY be adjusted if the site has members that can log in. If the members should not be given access to the site during the maintenance period, then choose “Custom” from the dropdown and select “Administrator” from the check list, otherwise leave this setting as “Logged In Users”.
“Excluded URLs” should be left as the default option “Show on the Entire Site” unless requested to only show on a certain page.
You may ignore the whitelist IPs section, unless troubleshooting is needed.
Once you have all your settings in place, click the “Save Changes” button at the bottom of the page. Once you refresh you will see a new notification at the top of the dashboard indicating that Maintenance Mode is active.

Now anyone who is not logged in to the site, or fit the settings above, should see the page you created in step 1when visiting the site, without any header or footer.
Disabling Maintenance Mode
To disable Maintenance Mode, simply go back to the PowerPack Menu under settings, click on the Maintenance Mode tab at the top, and Choose “No” from the dropdown.
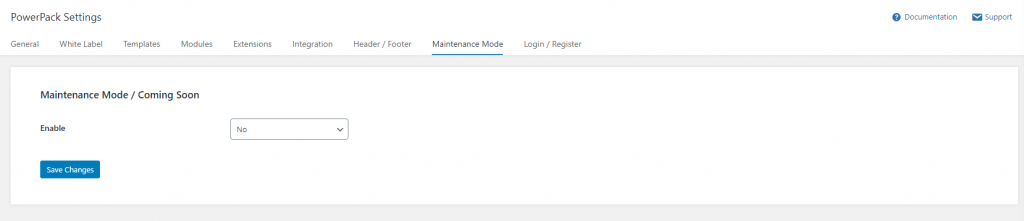
Save the changes and refresh. You will notice the red notification at the top is now gone and the home page will return to normal.
Note: Do not delete the page you created in Step 1. If the customer ever requests this again in the future, it will already be built out and ready to activate.