
Selecting a Featured Image for Pages/Posts
April 25, 2023 | Beaver Builder, Tips & Tricks, WordPress
Every page of our WordPress sites must have a featured image. Selecting the right image for search engine optimization (SEO) purposes can greatly enhance the visibility of the WordPress page or post in search engine results pages (SERPs). This will also be the image that shows up when a site is searched for in a web browser, or if a page or site is shared to a social media account, within a message, etc.
Here’s a guide on how to pick the best image to be the featured SEO image for a page or post in WordPress.
Choosing a Relevant Image
Selecting a relevant image is essential for optimizing your content for search engines. A featured image should serve as an introduction to a post, or to the content of the page, so it needs to be relevant to the content. For instance, if you’re writing a blog post or page on the benefits of hiking, an image of a person hiking or a scenic trail will be more relevant than a random image of a mountain. Follow the directions below to select the most relevant image for the page or post.
- Choose the Hero Image or First Image on the Page – Often the first image used on a page, or even the hero image is the best representation of the content of that page. There are also instances where there is very little content on a page, and these images are the only ones used. In these cases, use the hero or first image on the page as your featured image.
- Choose a Related Image from the Customers Gallery – In some cases, some pages do not have images added as part of the page design. An example of this might be a contact page or a calendar page. If a page you are working on does not have any images on it, look through the media library for a relevant image or simply choose an image that is relevant to the business itself.
- Choose featured images from our stock libraries: If a site is not using photos at all, you will want to choose featured images from our stock libraries. Google the type of business and view the images that populate in relation to that business. Choose similar types of images from our approved stock galleries:
https://photos.wdsgallery.com/
https://www.pexels.com/
https://unsplash.com
Featured Image Best Practices
Use High-Quality Images
Using high-quality images can help increase user engagement, reduce bounce rates, and improve search rankings. Choose images that are clear, crisp, and have good color contrast. Avoid using images that are pixelated, blurry, or have watermarks.
Optimize the Image Size
The size of the image is also an important factor for SEO. Large images can slow down your website, which can negatively affect search engine rankings. Optimize the image size by compressing it without reducing the quality. A recommended size for SEO images is *1200 x 628 pixels.
*Note: If you are resizing an image that is on the page, make sure to copy the image, or upload a 2nd version of the image, as resizing will likely create pixelization and loss of qualify of the image on the page.
Using descriptive file names for your images can help search engines understand the content of the image and its relevance to the page or post. Use keywords in the file name that are relevant to the content. For example, instead of naming your file “IMG0001.jpg,” name it “hiking-trail-mountains.jpg.”
Use Alt Text and Image Descriptions
Alt text and image descriptions provide additional information about the image for search engines to understand. Alt text is a brief description of the image that appears when the image cannot be loaded, or for people who use screen readers. Image descriptions provide more context about the image for visually impaired users. Include relevant keywords in the alt text and image descriptions.
Test the Image
Testing your image is essential to ensure that it looks good and functions properly on all devices. Test the image on different screen sizes and resolutions to ensure that it displays correctly. Additionally, test the image load time using tools like Google PageSpeed Insights to ensure that the image doesn’t slow down your website.
Selecting the appropriate featured SEO image for a page or post in WordPress is an essential task. By choosing a relevant, high-quality image, optimizing the image size, using descriptive file names, adding alt text and image descriptions, and testing the image, you can improve the visibility and ranking of your website in search engines.
How to Set a Featured Image in WordPress
To set the featured image, from WordPress dashboard, go to Pages and hit “edit” on the page you are working on. Then, in the right-hand sidebar, look for the Featured Image section:
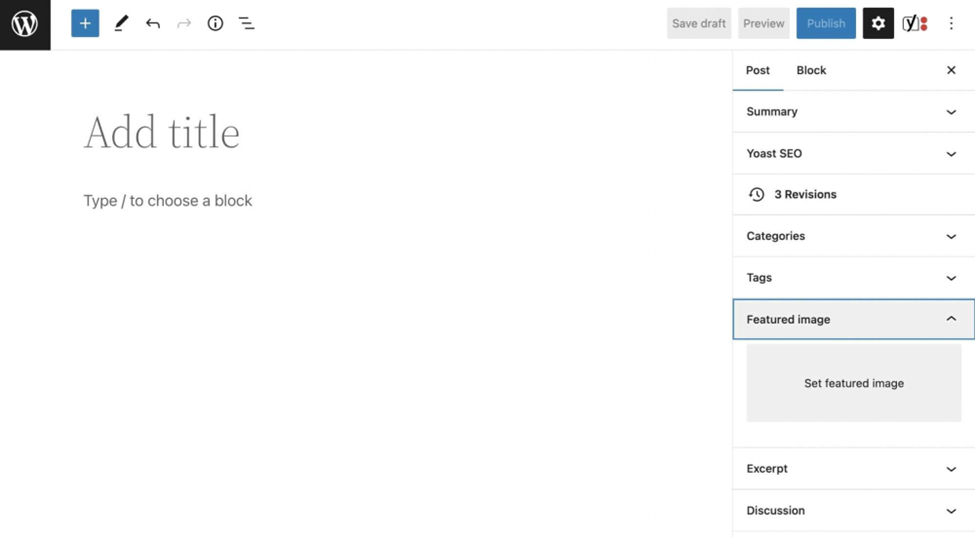
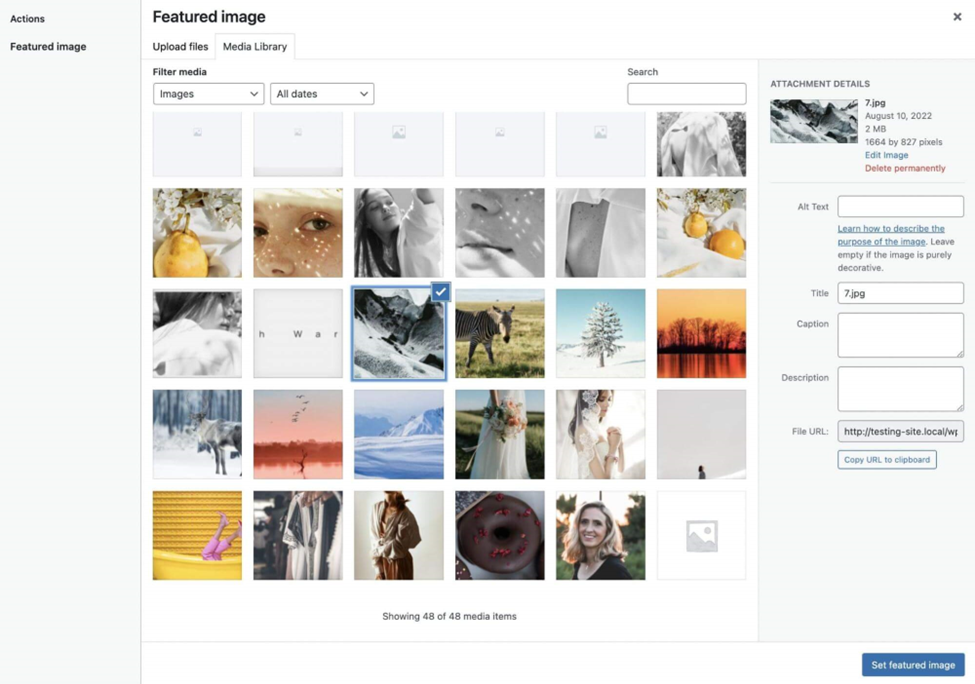
Here, click on Set Featured Image. This will open a pop-up where you can upload your media file or select an image from the Media Library:
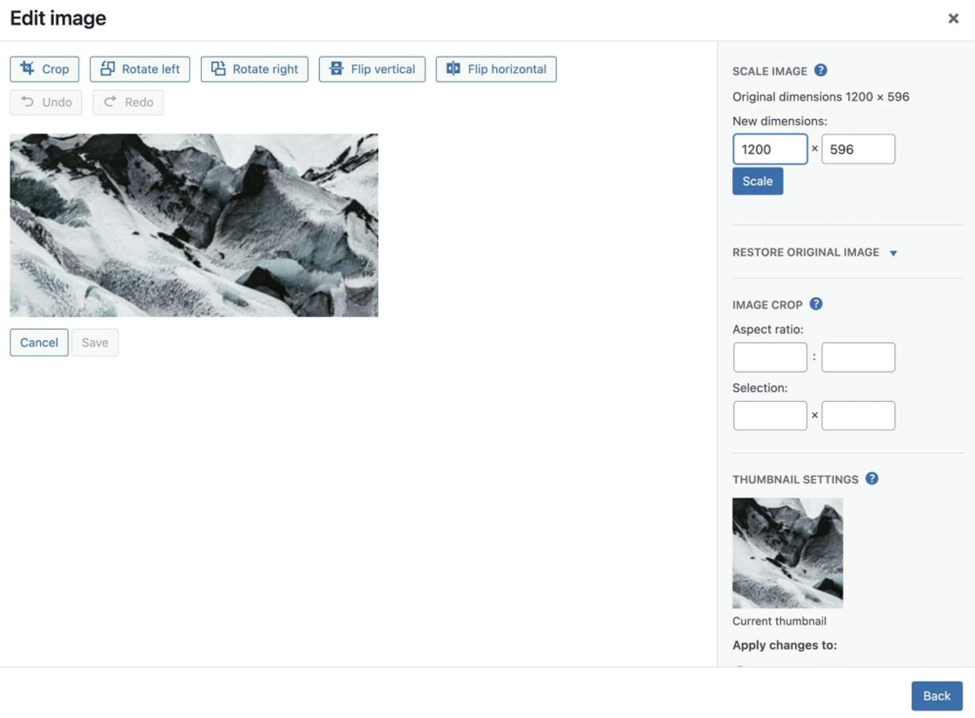
If you are using an image that is being used on the page, and you need to adjust the image size for optimization, make sure to copy the image, or upload a 2nd version of the image, as resizing will likely create pixelization and loss of qualify of the image on the page. Once you have a copy of the image, if it has not been resized outside of WordPress, find the Edit Image button. Then, use the various editing options to scale, crop, rotate, or flip the image as needed:
When you’re done, hit Set featured image. You’ll now see a preview of the image that will show up when searching for your site on a browser or sharing it in social media etc. – THAT’S IT!