
Importing WooCommerce Taxes with a CSV
September 8, 2022 | Tips & Tricks, Troubleshooting, WooCommerce
Important Note: We will not set up taxes or generate tax information. This guide will only discuss importing from a provided CSV file. The customer MUST provide this file.
Enable Taxes
In the WordPress dashboard, verify that taxes have been enabled by going to WooCommerce > Settings > General > Check the box next to Enable Taxes

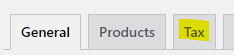
Save the changes and then to verify you will see a new Tax tab at the top of the page.
Import
In the Dashboard go to Tools > Import > Click Run Importer under “WooCommerce tax rates (CSV)”

On the next page you will click Choose File and select the customer provided CSV. Then Click the “Upload file and import” button and you are done.
If you would like to verify, go to WooCommerce > Settings > Tax > and click through the rates options at the top. These tables should now have the imported information.
Troubleshooting
If you get an error when uploading a file, please check for the following items:
- Verify the columns match the sample_tax_rates.csv
- If the columns are out of order, put them in the correct order according to the sample.
- If the columns are not anything like the sample, open a non-technical clarification asking for the customer to adjust the csv to match the columns in the sample
- Make sure the file name is lower case with no spaces, underscores are acceptable
- Re-save the file as a UTF-8 csv
If you have verified all the above are correct, open a technical clarification for further troubleshooting.
Column Tips
Country Code Column
This needs to be a 2 digit country code. A list of the current codes can be found here by looking under the “Alpha-2 code” column.
You can leave this field blank (*) to apply to all countries.
State Code Column
This needs to be an abbreviated state code. For most countries (including the United State of America) this would be a 2 digit code. Ex: AZ, IA, NY
You can leave this field blank (*) to apply to all states.
ZIP/Postcode Column
This needs to be a list of zip or postal codes that match the applicable country’s formatting.
You can leave this field blank (*) to apply to all postcodes.
Tips:
- Multiple zip codes can be added in one cell but you must separate them by a semi-colon. Ex: 85260; 85284
- Zip code ranges can also be added by including an ellipsis (…) between the zip codes. Ex: 85284…85290
- This would include all zip codes between 85284 and 85290, such as 85285
- Wildcards (*) can be used to match several post codes. Ex: 85*
- This would include all zip codes that start with 85, such as 85210 and 85225
City Column
This needs to be a list of cities. Multiple cities can be separated by a semi-colon. Ex: Tempe; Scottsdale
You can leave this field blank (*) to apply to all cities.
Rate % Column
This needs to contain the tax rate percentage and can use up to four decimal places. For example, for a 7.5% tax rate you would enter 7.5
Tax Name Column
This is the name of the tax you are applying and can be named anything of your choosing. Ex: AZ Sales Tax, VAT
Priority Column
You can use this to set priorities for tax rates using a number. Ex: 1 or 2
If multiple tax rates share the same priority then only 1 of them will be used. You can use this to define multiple tax rates for a region by giving them separate priorities. For example, if you need to charge a separate Federal Tax, State Tax, and City Tax.
Example:
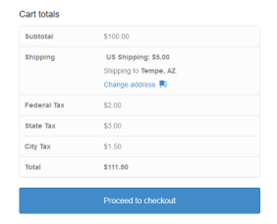
A business in Tempe, Arizona may need to charge 2% Federal tax to customers in the US, then an additional 3% state taxes for a customer in Arizona, and then an additional 1.5% city taxes for a customer in Tempe. They could set the taxes up to charge appropriately and as separate line items by setting the priorities as follows:
Federal Tax: 1
State Tax: 2
City Tax: 3
Since they each have a different priority then they will each be applied if the customer lives within the appropriate region. For example, a customer in Tempe would pay the City, State, and Federal taxes while customers in other Arizona cities would only pay the State and Federal taxes and customers in other states would only pay the Federal taxes.
If they follow this priority formatting they can generate separate State and City taxes as need on a state by state basis.
Below are screenshots of how this setup would look in the spreadsheet as well as how it would display in the cart.

Tips:
- Defaults to “1”
- If the customer’s location has multiple rates with the same priority then the system will choose the rate that is closest to the top of the list.
Compound Column
You can choose to set each tax rate as Compound, which means that this tax rate would apply on top of all prior taxes, meaning that the prior taxes would be included in the total when calculating this tax.
Tips:
- This field only accepts “0” or “1” for “No” and “Yes” respectively.
- Enter a 0 if the rate should not be compound
- Enter a 1 if the rate should be compound
Shipping Column
You can choose to apply the tax rate to the shipping costs.
Tips:
- This field only accepts “0” or “1” for “No” and “Yes” respectively.
- Enter a 0 if the rate should not apply to the shipping costs
- Enter a 1 if the rate should apply to the shipping costs
Tax Class Column
WooCommerce allows you to create separate Tax Classes that can be assigned to your products in case different products need to charge different tax rates. For example, food items may have a lower tax rate than entertainment items so you may assign them to different Tax Classes.
Leave tax class blank for standard rates.
Tips:
- By default WooCommerce comes with three tax classes: Standard, Reduced rate, and Zero rate, but you can create custom classes if needed.
- When assigning a tax class (other than Standard) via the spreadsheet you will need to enter the tax class’s “slug”. The slugs for the default classes are:
- reduced-rate
- zero-rate